


My newest hunting bow, And build along.
 07-16-2008, 09:32 AM
#32
Dominant Buck
Thread Starter
Join Date: Feb 2003
Location: land of the Lilliputians, In the state of insanity
Posts: 26,274
ORIGINAL: bigcountry
Hey Burnie, do you use a belt sander on those tips? I found antler to be hard stuff to flatten.
Hey Burnie, do you use a belt sander on those tips? I found antler to be hard stuff to flatten.

 07-16-2008, 09:56 AM
#34
Guest
Posts: n/a
ORIGINAL: burniegoeasily
Just to flatten them. Ill shape my tips later with a file, dremal tool, and sand paper.
ORIGINAL: bigcountry
Hey Burnie, do you use a belt sander on those tips? I found antler to be hard stuff to flatten.
Hey Burnie, do you use a belt sander on those tips? I found antler to be hard stuff to flatten.
07-16-2008, 11:23 AM
#35
Dominant Buck
Thread Starter
Join Date: Feb 2003
Location: land of the Lilliputians, In the state of insanity
Posts: 26,274
Thanks Bob
Bigcountry
yea tillering is the hard part to get down. Its what makes or breaks the bow. The best advice I can give when it comes to tillering is; Take your time. When you start feeling tired or iritated, put it up. You will be surprised how much easier it is when you come back to it fresh instead of trudging on.
Here is where im at now.
After a mound of shavings and several gallons of elbow grease. My fingers are telling me I need to invest in a draw knife or spoke shaver.
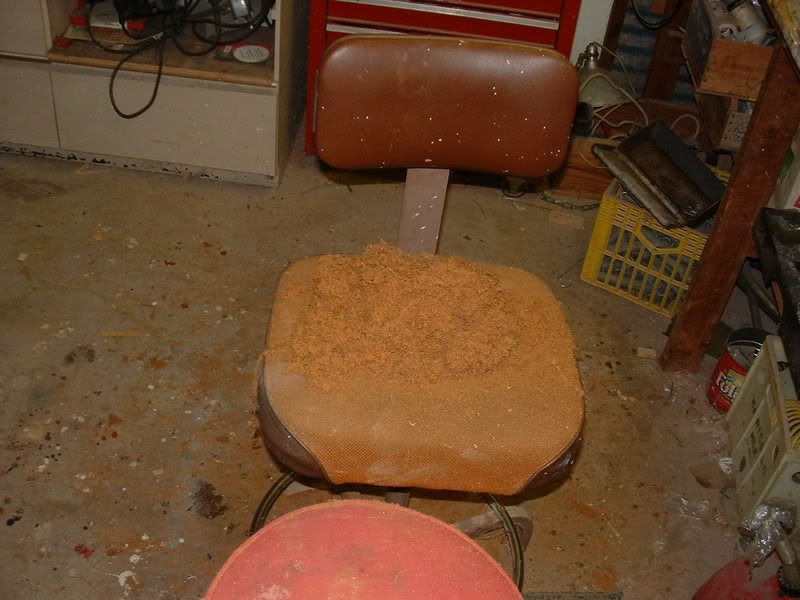
Wow, that mound doesnt look as big in pictures as it does in real life.
Im now off the long tiller string and have put on a shorter string. This string is just long enough to slip around the string grooves. Still not to brace yet but getting real close. Here she is flexed at 8". Two more inches and ill attempt to brace here. Then the tillering will start going a bit quicker. Now I remember why I wanted to make several laminated bows before coming back to a self or board bow. My fingers are getting soar. lol
Bigcountry
yea tillering is the hard part to get down. Its what makes or breaks the bow. The best advice I can give when it comes to tillering is; Take your time. When you start feeling tired or iritated, put it up. You will be surprised how much easier it is when you come back to it fresh instead of trudging on.
Here is where im at now.
After a mound of shavings and several gallons of elbow grease. My fingers are telling me I need to invest in a draw knife or spoke shaver.
Wow, that mound doesnt look as big in pictures as it does in real life.
Im now off the long tiller string and have put on a shorter string. This string is just long enough to slip around the string grooves. Still not to brace yet but getting real close. Here she is flexed at 8". Two more inches and ill attempt to brace here. Then the tillering will start going a bit quicker. Now I remember why I wanted to make several laminated bows before coming back to a self or board bow. My fingers are getting soar. lol
07-16-2008, 11:25 AM
#36
Dominant Buck
Thread Starter
Join Date: Feb 2003
Location: land of the Lilliputians, In the state of insanity
Posts: 26,274
After looking at the pic, I can see i need to do some work on the left limb before moving on. I think ill be giving this bow a rest until the end of the weekend. Im headed out tomorrow morning to the lake cabin. Got some friends coming up from Dallas and we are going to try to see if we can find some walleye and catfish. 
07-16-2008, 12:24 PM
#37
Guest
Posts: n/a
ORIGINAL: burniegoeasily
After looking at the pic, I can see i need to do some work on the left limb before moving on.
After looking at the pic, I can see i need to do some work on the left limb before moving on.
07-16-2008, 05:20 PM
#38
Dominant Buck
Thread Starter
Join Date: Feb 2003
Location: land of the Lilliputians, In the state of insanity
Posts: 26,274
Bigcountry
When I get home ill post some pics of a tillering trick that might help you out. I did a little work on the bow before I came to work. Ive got her bending to 18" at 50lbs. Ive got a slight hing on one of the limbs, but should have enough wood left to straighten it out and still get close to 60lbs @ 30".
When I get home ill post some pics of a tillering trick that might help you out. I did a little work on the bow before I came to work. Ive got her bending to 18" at 50lbs. Ive got a slight hing on one of the limbs, but should have enough wood left to straighten it out and still get close to 60lbs @ 30".
07-16-2008, 09:58 PM
#40
Dominant Buck
Thread Starter
Join Date: Feb 2003
Location: land of the Lilliputians, In the state of insanity
Posts: 26,274
Thank you NY/Al
I did a little more work on her today. I have her now to brace. Now its the time that you have to really watch what is going on and what the limbs are telling you.
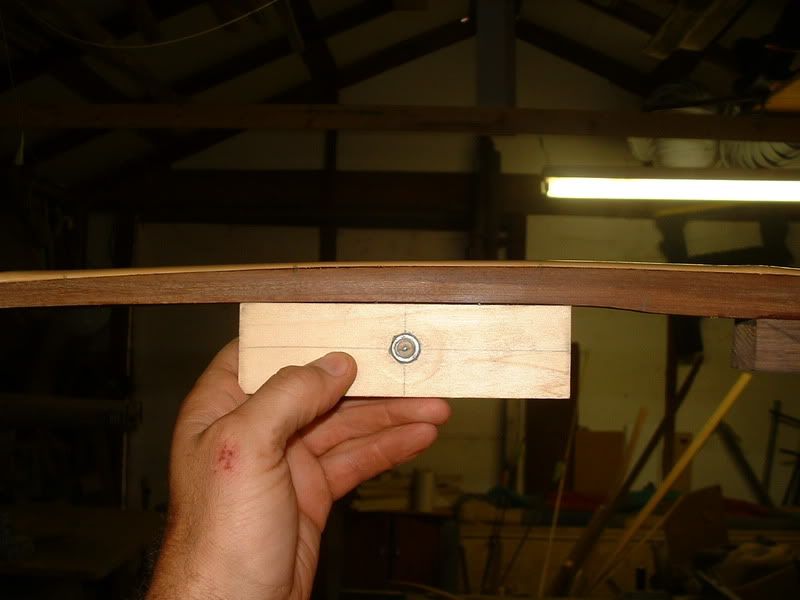
I am now going to use a simple tillering tool to get the limbs bending even. Im going to quit reducing the belly as a whole and now focuse on the places that need it.
This is just a piece of wood with a nut in it. I have a pencile threaded in the nut and can adjust it by screwing it in or out.
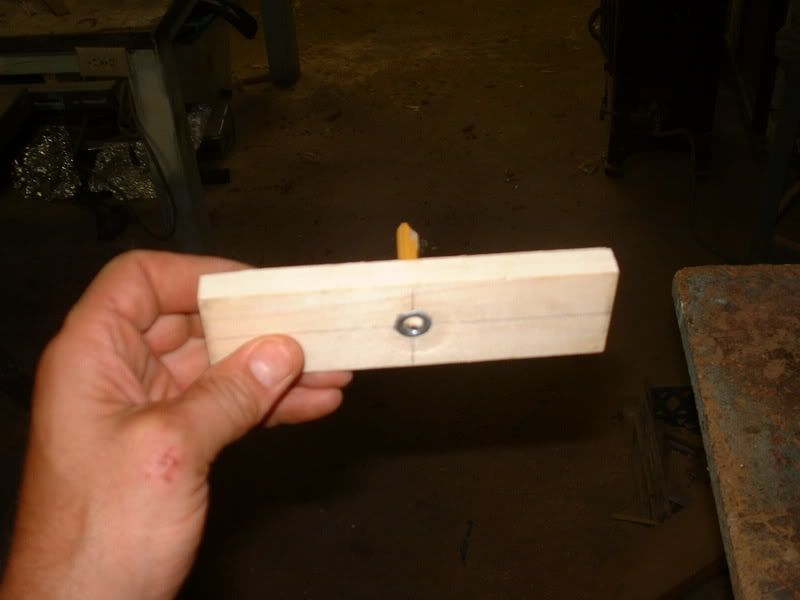
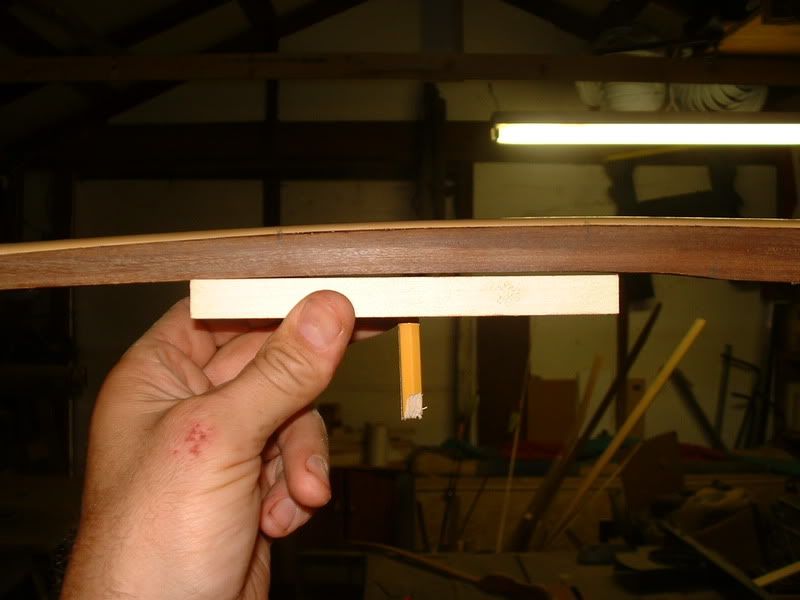
While the limbs are still stiff, Ill use the edge of the tool. Ill run it along the belly of the limbs and look at the gap between the middle of the tool and the belly of the wood. I want it to be the same down the limb and equal to the gap from the other limb.
I work on the limbs in the places where the gap gets smaller and creates a flat spot. Once the limbs get to bending more, I use the pencil side. I adjust the pencile to where it almost touches the limb at the fade, I then run it down the limb. It will mark the flat spots and you can see the gap increase to idenify hinges.
I did a little more work on her today. I have her now to brace. Now its the time that you have to really watch what is going on and what the limbs are telling you.
I am now going to use a simple tillering tool to get the limbs bending even. Im going to quit reducing the belly as a whole and now focuse on the places that need it.
This is just a piece of wood with a nut in it. I have a pencile threaded in the nut and can adjust it by screwing it in or out.
While the limbs are still stiff, Ill use the edge of the tool. Ill run it along the belly of the limbs and look at the gap between the middle of the tool and the belly of the wood. I want it to be the same down the limb and equal to the gap from the other limb.
I work on the limbs in the places where the gap gets smaller and creates a flat spot. Once the limbs get to bending more, I use the pencil side. I adjust the pencile to where it almost touches the limb at the fade, I then run it down the limb. It will mark the flat spots and you can see the gap increase to idenify hinges.